uppababy cruz seat height Cruz V3 + Mesa V3 Travel System
SKU: 14684323379
uppababy cruz seat height

uppababy cruz seat height Cruz V3 + Mesa V3 Travel System

Sale price$22.65 Regular price$25.17
Save 10%

Shipping Estimate
USA
  • USA
  • CAN

Ships within 48 hours · Estimated delivery Jul 7 - Jul 12

Promo Codes Available:

For Your Every Summer RSVP, with Code: SUMMER15

Description

uppababy cruz seat height Cruz V3 + Mesa V3 Travel SystemThe UPPAbaby Cruz V3 full sized stroller + Mesa V3 Infant Car Seat is the ideal travel system for your new or growing family. Experience style, portability, convenience, and safety to make your busy life that much easier! With innovative security features and more, you and your little one will enjoy smooth, safe adventures wherever life takes you. Enjoy the performance of the Cruz V3 Stroller, newly updated and offering easy maneuvering and a smooth

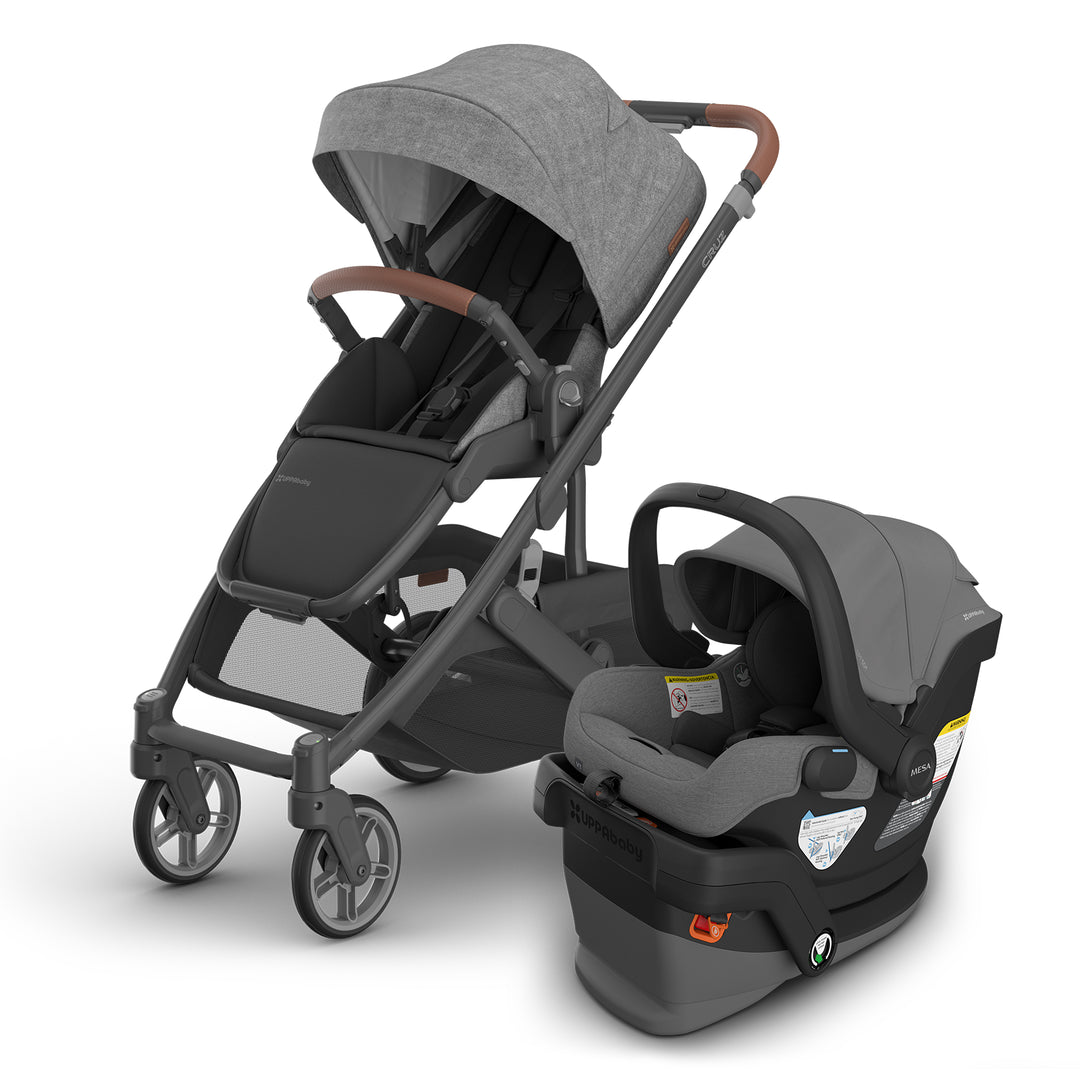
The UPPAbaby Cruz V3 full-sized stroller + Mesa V3 Infant Car Seat is the ideal travel system for your new or growing family. Experience style, portability, convenience, and safety to make your busy life that much easier! With innovative security features and more, you and your little one will enjoy smooth, safe adventures wherever life takes you.

Enjoy the performance of the Cruz V3 Stroller, newly updated and offering easy maneuvering and a smooth ride for your kiddo. The Mesa V3 Infant Car Seat brings you added protection for your little one's safety with a snug yet comfortable fit.

The Cruz V3 Stroller + Mesa V3 Infant Car Seat Travel System combines everything you need to complete your travel needs. The seamless convenience means parents can spend more time enjoying their family time, knowing their little one is safe and comfortable. From added security features to ultra-plush inserts, you and your baby will travel in luxury.

UPPAbaby's dedication to high-quality products and ultimate safety features makes it the ideal brand for your family's needs. Enjoy the lightweight build, dependable performance, and streamlined design in your choice of colors.

Additional Specs:

Cruz V3 Stroller

  • The Cruz V3 stroller frame is constructed of the same frame as the Cruz V2, combining aluminum with magnesium for optimal lightweight durability and performance. The newly updated Flexride Suspension system keeps the ride smooth with one, two, or even three kids. The no-puncture wheels are now lighter and are equipped with reflective accents to keep you safe when strolling at night.
  • XL storage basket allows for easy access to essentials and additional space to store items when out shopping or running errands. The basket is now equipped with dedicated Rain Shield storage for even more convenience. New to the Cruz V3 model is an All-Weather Comfort Seat that includes a removable insert for cooler days and converts to mesh during the warmer seasons, comfort is accessible around the year.
  • The telescoping handlebar allows for comfortable height adjustments for parents of varying heights. The handlebars and bumper bars are accented with hand sewn 100% full-grain leather and perforated for added grip. The new fabrics are premium and full-grain leather details are now REACH certified.
  • Toddler Seat suitable from 3 months to 50 lbs. The multi-position recline feature allows for added comfort for taking naps or sitting upright to sightsee offering more flexibility with your busy toddler's needs. Now with a higher back and deeper footrest for added leisure. Front and rear-facing capabilities and a one-hand release pivoting bumper bar allow for easy loading and unloading. As your child grows the Cruz V3 grows too, and can now accommodate up to 30 different setups. The adjustable canopy easily slides to accommodate your growing child.
  • The Cruz V3 stands when folded. The one-step fold is intuitive and can easily be done with or without the toddler seat attached.
  • Sibling compatible with the purchase of a RumbleSeat, Mesa infant car seat, Aria infant car seat, or PiggyBack sibling board. If you are blessed with twins the Cruz can seamlessly accommodate with additional adapters.
  • Bassinet sold separately.
  • Unfolded: 32.8"L x 25.7"W x 39.5"H
  • Adapters are not needed for Mesa V3

Mesa V3 Infant Car Seat

  • Suitable 4-35 lbs. and up to 32in height (whichever comes first)
  • Car Seat dimensions: 17W x 25.8L x 23H
  • Car Seat dimensions on Base: 17W x 28L x 25H
  • Car Seat Base-only dimensions: 14.5W x 21.3L x 10.3H
  • Car Seat weight: 9.9 lbs.
  • Base weight: 9 lbs.

Shipping Notes
  • Free Standard Shipping on $100+ Orders to the USA.
  • Except Preorder products are shipped in 48 hours.
  • Delivery to the USA:
  1. Standard Shipping : 3-10 business days
  • If time is of the essence, please consider selecting expedited delivery for faster service.
Exchange/Return Notes
  • We offer a 30-day return/exchange service after receiving.
  • Final sale items are not eligible for returns or exchanges.
  • To process your return/exchange, please contact us at [email protected]
  • Please click here for more details>>> Return & Exchange Policy
SKU: 14684323379

Discover Niche Categories That Outsell uppababy cruz seat height

Top-Converting Item to Boost Your Average Order

4.4 ★★★★★
Based on 1712 reviews
Sort
Highest Rating
Newest First
Oldest First
Product Reviews
E
Verified Purchase
Eric J. Jenislawski
Whiting, US
★★★★★ 5
Great result, exceptional value, and easy, forgiving application.
Size: TRIM COAT KIT
I am thoroughly pleased with the results of this product, and the application was easier than I expected. Outstanding stuff. I am writing a longer review in case it helps people who are unsure about a "once and done" product that calls itself permanent. It's not hard to apply. It is forgiving and there's time to even it out. But here are some things to anticipate. My use case: I used Cerakote to restore the plastic trim on a used 2014 black Dodge Challenger that had been repainted but the plastic trim was original and it had been kept outside by the prior owner, so the contrast between the new paint and faded trim was noticeable. The trim was originally a deep, dark gray (it is never as black as the paint). It had faded to a medium-gray in many places: running boards on the side beneath the door, below the read bumper (which were also somewhat worn from debris), around the tail lights, and the plastic piece beneath the windshield wipers between the windshield and the hood. These were all looking weathered. The trim was very oxidized in some places, chalky grey near the hood and around the back bumper. The plastic around the tail lights also had light streaks in it from where water drains down from the trunk. What else I tried before I tried Cerakote: I got middling results from Mother's Back to Black. It looked somewhat better for a week or two, and then it went back to looking as before. Not impressed. I got a tip online to try rubbing the plastic trim with a melamine magic eraser, so I did that next, and this made a significant difference. Melamine is abrasive, so be careful if you do this on your trim. I went gently, up-and-down, side-to-side and in small circles, by hand, with gentle pressure like one would with a polishing compound. By removing the oxidation, the plastic was a few shades darker in the worst spots and the streaking on the rear tail light piece was gone. The rough spots on the trim at the bottom of the car and around the wheels looked somewhat better. But it certainly did not "like new." Cerakote experience: I decided to give Cerakote a try based on the video and good reviews. Bam! Back to factory-like deep dark gray. I wish I had taken pictures. It's incredible. Fully satisfied! I had already washed the trim with Dawn dish soap. I started with the trim bone dry. You are warned everywhere that water droplets will ruin the result, so don't expect to do this process right after you wash the car unless you like to live dangerously and have compressed air to spray cracks and crevices. I was worried that application would be streaky if I didn't do it right. Not so. It is forgiving. Here's what I learned. 1) The first 20% of what you'll get out of the packet goes on heavy with the lightest touch. One packet goes a long way. The next 60% is the "normal" application. This goes on the easiest. You can really milk the last drop out of each towelette, but I didn't because the last 20% of what you can get out of it by rubbing it really hard comes out very light and is not worth the uneven application unless you have some random area you don't care much about and want to use the remainder for that. I only used 5 packets to do the whole car. When you start a new packet, the beginning is where you might want to go back later and even it out once the application gets more normal. Or better, start a new packet on a big section to spread it around well and then move to smaller trim when the towelette is less fresh. 2) You've got time to work with it and make corrections. It stayed liquid like water for at least 20 minutes in my conditions: about 80 degrees, not very humid, indirect sunlight on an 80 degree car. Don't apply in direct sun or on a hot car. The product then gets sticky as it cures, but you can still work with it during the sticky time, rubbing it in and spreading it evenly with the towelette. I did not use a microfiber to "knock down" heavy spots. I just came back around with the towelette. I think a dry microfiber might pull off too much product. When it is half-cured, it is sticky and you can buff it with the towelette at this stage to further flatten and even things out. Work in sections, one piece of trim at a time. 3) Overlaps won't show as long as you rub it all in thoroughly. I tried the overlapping parallel passes method that they recommend, and this works pretty well. I was worried that I might get a "double heavy" streak where the passes overlap but this not so unless the towelette is fresh, but this is fixable. You can do a pretty natural, casual back-and-forth motion for the most part and it comes out fine. This is NOT a super-finicky product. I made a second or third back-and-forth pass in a few areas, and used circular motion in some places where the trim was textured or a little rough from wear, and it all looked even in the end. Just rub it down into the plastic and even out the sheen while it is uncured and it's good. 4) It cures like you see it when it's still wet. It doesn't lighten up very much as it cures. It just looks a little less wet. So get it right by eye when it is wet and that's pretty much what you will still have in an hour when it is cured. 5) Don't miss a spot! You'll see it for sure if you do because the different is so dramatic. And a "second coat" is not easy or recommended. This is the only once-and-done part that you want to get right, and you have plenty of cure time to be thorough. 6) Use the folded corner of the towelette to get into small corners and edges, like where the trim meets the paint or has an inside corner or some little nook. A fresh towelette is great for getting into small areas because a feather touch applies plenty of product when the towelette is fresh. The trim now looks amazing and I am entirely satisfied. I will use Cerakote on my other vehicles. The only minor con is a strong ammonia smell when you are up close to it while it is wet. No smell once it is cured. I would definitely wear the recommended gloves while applying. As others say, you will probably drop that towelette on the ground. It's slippery when wet. Keep it folded in quarters as it comes for ease of application. Turn to a new quarter once a side gets dirty or dry and fold it inside out for four more quarters to use. Bonus, but off-label -- at your own risk: The product is not intended for the soft rubber around the windows, but I tried it there too, and it looks amazing. All I did was wash the rubber with dish soap like the trim, and I rubbed it a few times with a wet microfiber cloth to get the superficial layer of oxidized rubber off. Then I applied Cerakote. It looks great. The rubber used to be blotchy and faded. The microfiber evened this out a little. I would not use melamine on the rubber -- this made it look worse in a test section. The Cerakote made it look great: jet black, much shiner, and much more even looking. Not quite "brand new" but far better than I thought possible. I thought I might need to replace the rubber. Now it's looking great next to the jet-black new paint. This afterthought use alone was worth the money. Can you apply a second coat the next day? They don't say you can, and I don't recommend it. This is meant to be one-shot, which is why you should check to make sure you don't miss any spots. I had two areas where I tried a second coat the next day. The first was on the plastic trim between the windshield and the hood. I didn't rub this trim much with melamine beforehand so there was a lighter area (light grey originally, the worst spot) that didn't get as black as the other sections so I did it again, which helped a little, but not much. I didn't wash this area with soap beforehand because I wasn't intending to fix it until I got going. Once you put things back to black you will start noticing other faded things more. Likewise, I did a second coat on the very top of the soft rubber at the bottom of the windows (the part which faces upward and thus gets the most sun), it wasn't as shiny as the other parts, so I went over that section gently again the next day with a fresh towelette. As soon as I did it, I thought it was a mistake. This didn't go well initially because the cured coating is very hydrophobic so the new, wet, Cerakote of the second coat goes on smooth initially and then "puddles up" into little droplets a few minutes later. It doesn't want to stick to the first coat. I thought I had messed it up, but I let it cure a little until the sticky phase, and spread it out again with the towelette. It stayed that time but gathered back a little into some streaks. I spread it once more a few minutes later and it looked good. It stayed even. It looks just fine a few days later, so I think it cured OK. I hope this product last for months as advertised. Even if it doesn't I would totally do it again because the results are superior, I still have half my towelettes left, and the product is not expensive. 10/10 would do again and will recommend to everyone.
WAS THIS REVIEW HELPFUL?YesReportShare
Reviewed in the United States on June 25, 2025
R
Verified Purchase
Robert Barger
Battle Creek, US
★★★★★ 5
Easy to use, amazing results
Size: TRIM COAT KIT
This is an awesome product that is easy to use and has amazing results. My plastic trim never looked so good.
WAS THIS REVIEW HELPFUL?YesReportShare
Reviewed in the United States on May 14, 2026
N
Verified Purchase
NorthFloridaLT
Massapequa, US
★★★★★ 5
Made My Bumper Look Brand New Again
Size: TRIM COAT KIT, Size: TRIM COAT KIT
I used this on the plastic trim and bumper on my truck, and I’m honestly impressed with how it turned out. The faded areas came back to a deep, rich black and really cleaned up the whole look of the rear end. I prepped everything the right way by washing it first with an all purpose cleaner, then wiping it down with 91% alcohol. I also taped off the surrounding paint and chrome just to be safe. After that, the application was simple and went on smooth without any streaks or blotchy spots. The difference was immediate. What used to look dull and worn now looks factory-fresh again. It also seems to bond well and not just sit on the surface like some cheaper products I’ve tried before. Overall, this was easy to use, gave great results, and made a noticeable improvement. I would definitely use it again on other trim pieces.
WAS THIS REVIEW HELPFUL?YesReportShare
Reviewed in the United States on April 12, 2026
E
Verified Purchase
E N.
Lowell, US
★★★★★ 4
Good product
Size: TRIM COAT KIT
Good coverage. I've had it on for about 10 days, and it's holding up better than any spray product I've used. Not perfect, but none of those streak lines you get with other products. It's been rained on twice so far.
WAS THIS REVIEW HELPFUL?YesReportShare
Reviewed in the United States on May 8, 2026
E
Verified Purchase
ernieupton
Port Orchard, US
★★★★★ 5
good product and value
Size: TRIM COAT KIT
worked great on the 10yr old outback. Lasted several months..until we traded it in for a new outback.. will find something else to use it on...!
WAS THIS REVIEW HELPFUL?YesReportShare
Reviewed in the United States on May 20, 2026

recommand products