grx 400 gravel bike Pearl Gravel Bike
SKU: 85929119015
grx 400 gravel bike

grx 400 gravel bike Pearl Gravel Bike

Sale price$18.14 Regular price$20.16
Save 10%

Shipping Estimate
USA
  • USA
  • CAN

Ships within 48 hours · Estimated delivery Jul 7 - Jul 12

Promo Codes Available:

For Your Every Summer RSVP, with Code: SUMMER15

Description

grx 400 gravel bike Pearl Gravel BikePLEASE NOTE Custom Information. Please provide information required for Perfect Position and Custom Information. For further inquiries, please call us at 805 707 2777. 4 weeks Lead Time. As the wheels are custom made after we receive your order, kindly allow 4 weeks of lead time for production and shipping. No Exchange Returns: All sales are final on Pearl Cycles as they are custom made. Overview Endless Gravel Fun.. Welcome to the range of bespoke

PLEASE NOTE
  1. Custom Information. Please provide information required for Perfect Position and Custom Information. For further inquiries, please call us at 805-707-2777.
  2. 4 weeks Lead Time. As the wheels are custom made after we receive your order, kindly allow 4 weeks of lead time for production and shipping.
  3. No Exchange/Returns: All sales are final on Pearl Cycles as they are custom made.
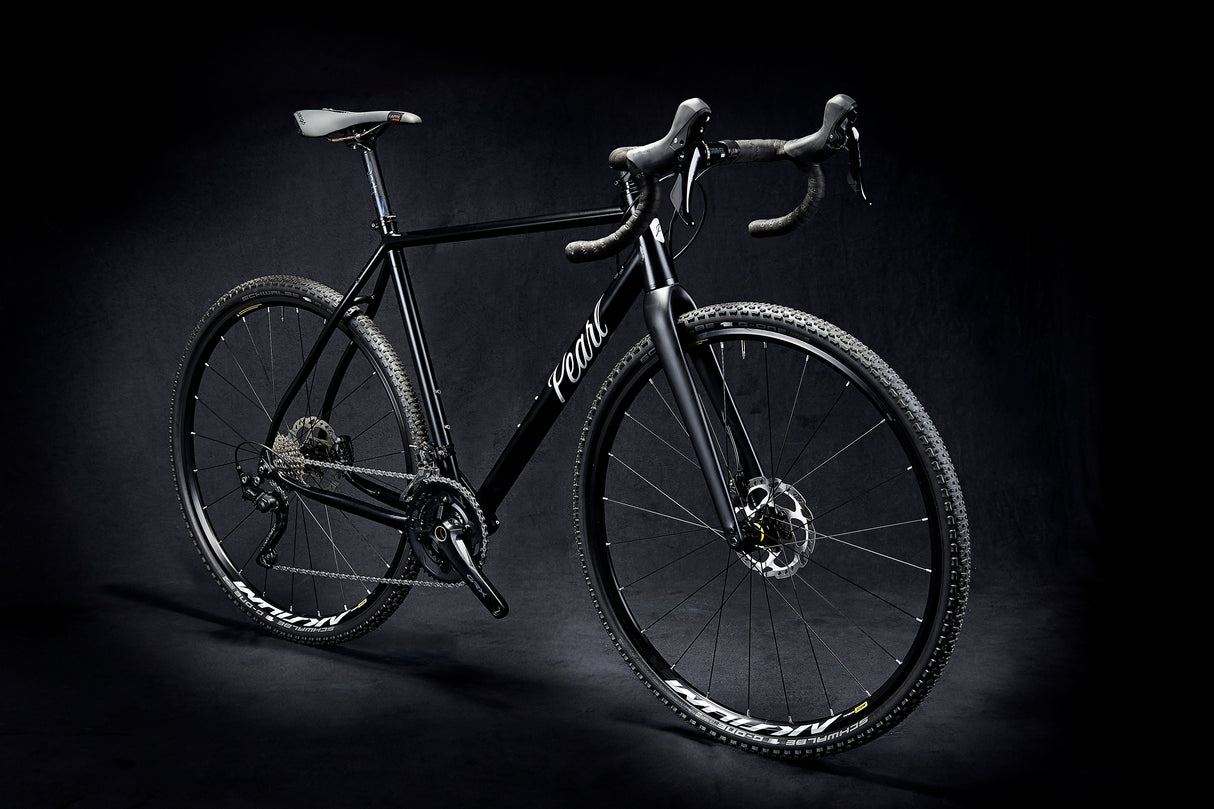
Overview

Endless Gravel Fun.. Welcome to the range of bespoke gravel bikes. Pearl offers an alloy and carbon frame that can both be tailored to meet your specific needs. The gravel frames fit both 650b and 700c tires. Fenders and carriers can also be mounted for any back packing adventure. 

  • Very Light and Reliable. “Fattura in Italia” (Handmade in Italy). Handmade with Dedacciai 7003 Aluminium Very light and reliable. This allows us to offer an entry level Gravel bike with superior weight and stiffness.
  • Reliable in Terrains. Pearl Gravel Al frames take 25 – 47 mm tires. Your ideal companion for a tour across Iceland. It was our aim to build a gravel bike that can be your reliable companion on any terrain!
  • Available in Various Colors and Sizes. There are 25 available colors and 5 different sizes for the buyer to choose from. The Empire Road bike is also available in 4 different types of framesets.
  • Customed to Ensure Suitability and Good Experience. In order to enjoy the features of the bike, it is not only important that the technical components function, it is also essential that the correct seating position is set. This is not only important with regard to the the frame size, but it is also critical that the correct settings of the handlebars and saddle are made. This is why Pearl Cycles requests the buyers to specify body measurements and other information.

Technical Specifications

Specifications

Frame/Groupset Shimano GRX 400 2 x 10
Wheelset Fulcrum DB 900
Bars Ritchey Venture Max
Seat post Pearl Alu Patent
Tyres Tufo Speedero
Saddle Selle Italia X3


Key Features

  • Deda 7003 Heat treated Aluminium
  • Smooth welded
  • Pearl carbon fork
  • Fits Carriers and Fenders
  • Internal cabels and DI2 Compatible
  • The frames takes 650b and 700c wheels
  • Fits 25 – 47 mm Tyres
  • 12mm thru axles
  • Frame weight 1500 gr
  • Fork weight 440 gr
  • Complete Bike weight 9,5 kg

Pearl Perfect Position

In order to enjoy the features of the bike, it is not only important that the technical components function, it is also essential that the correct seating position is set. This is not only important with regard to the the frame size, but it is also critical that the correct settings of the handlebars and saddle are made. These settings determine the seating comfort, influence the power transmission of the rider and therefore also the riders efficiency. Saddle discomfort, back pain, knee pain, and numbness in the hands are often due to bad posture. The sitting position should not be determined professionally.

Follow the next steps exactly and forward the information to us so that we can determine your perfect position on your Pearl Bike. Ask somebody to help you with this.

1. Measure your inseam. Measure your inseam standing against a wall, barefooted both legs together. Place a hardback book against the wall an move it up towards your crotch. Please note that is key that the measure is made to crotch bone.

2. Measure your body height. Stand straight against a wall and take a measurement from the ground to your shoulder bone.

3. Measure your arm lenght. Measure the distance from your shoulder joint to the middle of the palm of your hand.

4. Measure your total body height. Both feet together and without shoes, measure your total body height

Size Guide

Body size
152-163 cm tall
161-170 cm tall
170-175 cm tall
175-180 cm tall
180-185 cm tall
185-190 cm tall
190-195 cm tall

Frame Size
50 cm (XXS)
52 cm (XS)
54 cm (S)
56 cm (M)
58 cm (L)
60 cm (XL)
62 cm (XXL)

Custom Information

Please complete the information below and call our hotline. All information are important so we could give you the most suitable frame to ensure that you will have a good experience.

Custom Information
Phone Number:
Racing, Triathlons and cyclocross:
Inseam:
Body Length (to shoulders):
Arm Length:
Shoulder Width (outside - inside):
Age:
Body Weight:
Body Size:
Mileage per year?

Take part in races?

Flexibility Check (Yes/No)
Legs fully extended, how far can you reach? Please answer with yes or no.
Knee:
Shin:
Floor:
Hands on the floor:

Aero-Fit Triathlon? (Yes/No)
Short Distance:
Long Distance:

Other Questions
1. Which handling characteristics are more important to you? (Options: Weight, stability, and ride comfort).
2. What negative experiences you've experienced regarding riding?

Shipping Notes
  • Free Standard Shipping on $100+ Orders to the USA.
  • Except Preorder products are shipped in 48 hours.
  • Delivery to the USA:
  1. Standard Shipping : 3-10 business days
  • If time is of the essence, please consider selecting expedited delivery for faster service.
Exchange/Return Notes
  • We offer a 30-day return/exchange service after receiving.
  • Final sale items are not eligible for returns or exchanges.
  • To process your return/exchange, please contact us at [email protected]
  • Please click here for more details>>> Return & Exchange Policy
SKU: 85929119015

Discover Niche Categories That Outsell grx 400 gravel bike

Top-Converting Item to Boost Your Average Order

4.2 ★★★★★
Based on 2270 reviews
Sort
Highest Rating
Newest First
Oldest First
Product Reviews
L
Verified Purchase
L. Yu
Massapequa, US
★★★★★ 4
pretty good banana plugs
Size: 5 Pack, Pattern Name: Banana Plugs
i bought these over 6 months ago and i just installed them to the front left and right floor standing speakers - sony ssf-7000 i have them for over 10 years hooked up to a yamaha 7.1 AVR. alot of people have had trouble installing this - one single banana plug comes in 3 parts - the bottom and top (the banana plug tip) can be unscrewed. what i did was tightened the top first (top being the tip of the banana plug) then unscrew the bottom off completely - make sure you have like 3/4" - 1" (depending on your gauge of wire) of exposed speaker wire that is straight - then thread it through the hole at the bottom up - i then rolled the exposed 3/4 - 1" exposed copper wiring into a ball that is bigger than the hole of the banana plug bottom piece so the wire doesn't fall back through where it came from. then i screwed on the top and middle piece back with the bottom piece - tightening it a bit so i know there's good contact. also make sure the tip is screwed in all the way as well as a double check. what you don't want to do is have the copper wire touch the threaded part of the bottom piece - the wire will cut off from the screwing action. i plugged it into my sony speakers and it wasn't a real snug fit - a bit too loose to feel secure - it didn't seem to go all the way in - but it fit fairly well in my receiver. my intention was to use these banana plugs with my 2 channel set up but i decided to go pre-constructed mediabridge 12 AWG speaker cable instead - those fit my 2 channel set up on my receiver and elacs really snug and secure. i tested it and it works fine. i didn't hear any loss of signal or any extraneous noise. none of my (14 awg?) wiring fell through the bottom and it sounds good. so no complaints there. i bought 5 pairs - but i find that it is an odd number to include a package - even numbered pairs would be better. anyway they seem constructed well - easy enough to install and they do work. thanks for reading
WAS THIS REVIEW HELPFUL?YesReportShare
Reviewed in the United States on September 12, 2019
A
Verified Purchase
AB
West Palm Beach, US
★★★★★ 5
High quality and robust
Size: 12 Pairs, Pattern Name: Banana Plugs
Easily the best plugs I've found at a reasonable price. Solid feeling with good quality and they look good with easy to see red/black labeling. The tips tend to unscrew too easily, but this is a non-issue when they are in use, just something you have to be careful not to lose when assembling. It's a bit tricky to spread the wire out evenly at the exact right length. If screwing the plug together is hard at all, go back and shorten how much wire you bend over the lip.
WAS THIS REVIEW HELPFUL?YesReportShare
Reviewed in the United States on June 16, 2025
W
Verified Purchase
William
Lexington, US
★★★★★ 5
Solid banana clips
Size: 5 Pack, Pattern Name: Banana Plugs
Ah yes, I used these solid banana plugs to convert my wires. It’s pretty easy to set up once the wire housing has been stripped and really cleans things up nicely. I haven’t had any discernable hissing, noise problems, or connection issues.
WAS THIS REVIEW HELPFUL?YesReportShare
Reviewed in the United States on May 25, 2026
L
Verified Purchase
Leyland Cypress
Lexington, US
★★★★★ 3
Get the right wire guage
Size: 1 Count (Pack of 1), Pattern Name: Banana Plugs
I rate the banana plugs themselves 4 stars. They are everything I expected and work as advertised. It's the experience of assembly that I rate three stars. The way these work is -- you strip off the outer insullation of your wire and separate the two leads (positive and negative). Then you strip some length of insulation off the end of one of your leads, you unscrew the banana plug so that it separates into its respective base (lower) and contact (upper) halves, you slip the wire up through the base, you flare the copper strands of the wire and fold the individual strands over the very top of the base (about 1/16 of an inch) (taking care not to extend the strands over the threaded barrel of the base), then you screw the upper contact onto the lower base and voila, banana plug / wire assembly. It's not as complicated as it sounds. Go to the Monoprice website and watch their excellent instructional video. Here's the thing though. While the assembly is not complicated, it is tricky, and if you don't get your proportions right the first or second or third time, you'll have to do it over. Fist of all, if your wire guage is relatively thin, like my 16-guage speaker wire, you'll find that the entire wire, insullation and all, will slip right through the base of the plug without butting up against the bottom of the base. If this is the case, then the wire is left to sort of flop around inside the plug and that has a kind of unfinished, amateur look and feel to it, whereas if the wire butts up against the bottom of the base, it has a solid, one-piece professional look. So, to my mind, there's a sweet-spot for wire guage that works best with this plug -- not too thin and not too thick. And since Monoprice has debunked the thicker-is-better myth (the quality of the copper is the real determinant), then you should feel free to get the wire guage that fits the plug. Next -- and here's where it gets tricky -- once your copper extends beyond the top of the base, you'll need to limit this extension to about a sixteenth (no greatrer than a fourth) of an inch. Then you very delicately flare out the individual strands, in a 360- degree arc, and fold the strands over the top of the base. This takes a fair degree of manual dexterity, especially if the wire is "floating" inside the base and its travel is not stopped where the insullation meets the base. You'll have to hold the wire and base steady in the fingers of one hand, then flare out the wire strands with either your fingers or a suitable object (the working end of a ball-point pen worked for me) with the other hand. This one-sixteenth measure is important. If you extend wire strands beyond the top and over the threads of the base, you'll find that screwing the contact end onto the base is impossible and you'll need to start over. One or two strands is OK and almost unavoidable. In that case the screwing will catch but if you take a pair of pliers to it you can muscle through. By the way, you can avoid the whole mess by getting the open-screw type, which I'm sure will work just as well without any of the hassle of assembly. Like anything else, if you do it a few times to make the mistakes and learn the tricks, then it will become second nature, and if you've already done that, then my review might seem overly fussy. In that case feel free to leave comments to help other readers.
WAS THIS REVIEW HELPFUL?YesReportShare
Reviewed in the United States on October 15, 2012
J
Verified Purchase
JBDoge
Port Orchard, US
★★★★★ 5
Wish they came with instructions...
They are cheap and work great. They plug right into my Pioneer vsx521 receiver and my Paradigm Atom monitor speakers. I wish they came with instructions, because it took me about 10 minutes to realize the bottom part unscrews in addition to the top part. Here are my instructions for installation: 1) Unscrew the bottom part of this connector (the thin metal underneath the red/black ring). 2) Make sure the Banana Plug (which may be loosely screwed into the top part of the connector) is fully tightened down 3) Strip your wire tips to 3/8 of an inch (or just slightly under) 4) Run the first newly stripped wire end through the bottom part you removed in step 1, such that the stripped end of the wire is entering through the flat end and exiting through the smaller threaded end. 5) Leave about 1/8 to 3/16 of an inch of stripped wire hanging past the exit hole. 6) As evenly spaced as possible, bend the over-hanging wire strands over the exit hole (all around it, like a hat). If done properly, the wire should not fall out if you give it a VERY GENTLE tug. 7) Screw the top metal part (with the actual banana plug) back onto the bottom part. It may be difficult if your stripped wire is hanging too low. I've used a pair of pliers to grip the bottom part of the connector while I twist the banana plug side with my hand. If done correctly, you should be able to put a lot of tension between the wire and connector without removing/damaging it. UPDATE: I just recently helped my dad install his 5.1 system without these... it sucked... This item (5 pairs of them in this case) and a good wire stripper can save you alot of pain (both physical and mental). The connectors on the back of his receiver are the kind where bare wire comes in from the side and then the connectors screw down (with a banana plug hole in the center which is where this product would come into play). I felt like a surgeon trying to get a bare wire end into the little slot, and then holding it there while I tighten the connector which is almost impossible since they are so close together... GET THESE!
WAS THIS REVIEW HELPFUL?YesReportShare
Reviewed in the United States on February 8, 2012

recommand products