wohnmobil markisen hersteller Camping Markise
SKU: 35723291130
wohnmobil markisen hersteller

wohnmobil markisen hersteller Camping Markise

Sale price$21.60 Regular price$24.00
Save 10%

Shipping Estimate
USA
  • USA
  • CAN

Ships within 48 hours · Estimated delivery Jul 6 - Jul 11

Promo Codes Available:

For Your Every Summer RSVP, with Code: SUMMER15

Description

wohnmobil markisen hersteller Camping MarkiseDie Camper & Go Markise jetzt auch fr Camper mit Aufstelldach und alle, keinen Platz haben, oder im Stealth Modus unterwegs sind. Diese einzigartige, sttzenlose Markise spart dir Zeit und Stress. Ankommen, parken, und keine zwei Minuten spter im Schatten chillen! Du kennst die Camper & Go Markise noch nicht? Hier gibt es alle Infos! Produktbeschreibung Was macht die Camper & Go Markise Flex Line so einzigartig? Funktioniert ohne Sttzen, ohne Schnre,

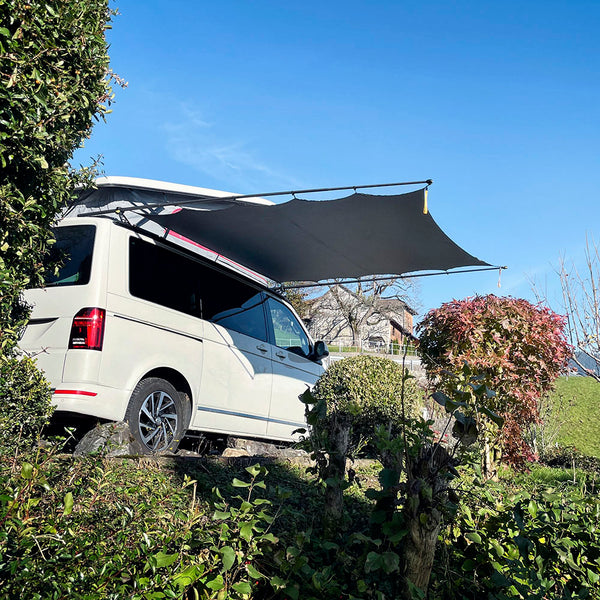
Die Camper & Go Markise jetzt auch für Camper mit Aufstelldach und alle, keinen Platz haben, oder im Stealth-Modus unterwegs sind.

Diese einzigartige, stützenlose Markise spart dir Zeit und Stress. Ankommen, parken, und keine zwei Minuten später im Schatten chillen!

Du kennst die Camper & Go Markise noch nicht? Hier gibt es alle Infos!

Produktbeschreibung

Was macht die Camper & Go Markise - Flex Line so einzigartig?

  • Funktioniert ohne Stützen, ohne Schnüre, ohne Stress. Nie wieder über die eigenen Heringe stolpern!
  • Sie ist mit 1,5-2,7kg super leicht und nimmt wenig Platz im Camper weg!
  • Abgebaut quasi unsichtbar. Du hast keinen hässlichen, schweren Kasten am Fahrzeug!
  • Keine extra Aufbauhöhe - also weiterhin Parkhaus geeignet!
  • Halterungen mit wenigen Handgriffen zu entfernen - Waschstraße ist damit wieder möglich!
  • Sie ist aufgebaut in 90 Sekunden - Abbauen geht noch schneller!
  • 100% Schatten - klingt selbstverständlich? Hier ist es wirklich so!
  • Wasserdicht - logisch!
  • Wasser läuft einfach ab und bildet keinen schweren "Wassersack"!
  • Bei Wind und Regen kannst du ganz entspannt bleiben. Die Markise hält! Zugelassen bis max. 25km/h.
    Warum diese Version der Markise?

    Die Camper&Go Markise - FLEX Line wurde für Fahrzeuge entwickelt, wo der Platz für die Installation sehr begrenzt ist - z.B. für Camper mit Aufstelldach.
    Sie ist aber genauso gut geeignet für Fahrzeuge mit und ohne Dachträger.

    Vorteile Camper&Go Markise - FLEX Line:

    • nahezu keine Aufbauhöhe
    • geringers Gewicht als TUBE Line 
    • Stealth Modus - fast unsichtbar
    • kein Dachträger erforderlich

    Vorteile Camper&Go Markise - TUBE Line:

    • etwas leichterer und schnellerer Aufbau als FLEX Line 
    • Grundsetup ist leichter zu installieren
    • perfekte Integration in Camper&Go Dachträgersystem
    • auch für höhere Fahrzeuge geeignet
    Wie wird die Markise aufgebaut?

    Wenn die einmalige Grundinstallation abgeschlossen ist, wird der Aufbau zum Kinderspiel.

    Hänge jeweils das Ende der Carbonstange mit dem Federblech im Puckmount ein und fixiere die Stange mit dem Sir Klemm-a-Lot. Danach nur die teleskopierbaren Stangen auseinanderziehen und den Stoff dazwischen spannen. Fertig!

    Achtung: bei Fahrzeugen mit Aufstelldach wird die Markise innerhalb der Dachschale verbaut. Das Bedeutet nur bei aufgestelltem Dach kann diese benutzt werden.

    Wie installiere ich das?

    Vorweg: Egal wie du das System installierst - die angegebene Breite der Markise definiert den Abstand von Carbonstange zu Carbonstange (Mitte-Mitte) und muss exakt eingehalten werden...

    Installation am Aufstelldach:
    Für diese Installation benötigst du in der Regel eine Rail (Multirail Brandrup, Reimo,...) am Fahrzeug. Daran wird mittels speziellem Adapter der Sir Klemm-a-Lot befestigt - eine flexible Befestigungslasche aus Gummi. Auf die Aufstelldach-Schale wird ein passender Puckmount installiert - geschraubt und geklebt. 
    Beachte: Diese Installation erfordert geeignetes Werkzeug, speziellen Kleber und ausreichend Erfahrung. Solltest du dir das nicht zutrauen, nutze unbedingt den Aufbauservice durch meine professionellen Partner. Natürlich muss dein Aufstelldach dafür geeignet sein. Falls es Zweifel gibt, frage beim Hersteller nach.

    Installation an Flächen, Dächern und Dachträgern:
    Für die Installation benötigst du je Stange einen Sir Klemm-a-Lot (flexible Befestigungslasche) mit, oder ohne Adapter und einen passenden Puckmount. Diese beiden Befestigungspunkte werden jeweils geschraubt und/oder geklebt. 
    Ob und welche Adapter du benötigst hängt davon ab, wo du es installierst und ob es stehen, oder hängend Installiert wird. 
    Wichtig ist aber in jedem Fall: Prüfe, ob dein Untergrund stark genug ist die hohen auftreffenden Windkräfte aufzunehmen. 
    Beachte: Diese Installation erfordert geeignetes Werkzeug, speziellen Kleber und ausreichend Erfahrung. Solltest du dir das nicht zutrauen, nutze unbedingt den Aufbauservice durch meine professionellen Partner.

    Für welche Aufstelldächer funktioniert das?

    Dieses Produkt ist neu und es wird hier nach und nach mehr Sets für Aufstelldächer geben. Solltes du Interesse haben, melde dich bei mir. Wir finden sicherlich eine Lösung, wenn dein Setup nicht aufgeführt ist.

    Fertige Sets gibt es für folgende Aufstelldächer. 

    • SCA 290, 194 - für VW T5 und VV T6 - 260cm Markise
    • SCA 260, 262, 264 für Citroën Spacetourer/ Jumpy, Peugeot Traveller/ Expert, Toyota ProAce/ Verso, Opel Zafira Life/ Vivaro C - 260cm Markise
    • SCA 324 - Ford Transit 2024 und VW T7 - in Planung!

    Beachte: für die Installation an Aufstelldächern benötigst du in der Regel eine Rail aussen am Fahrzeug.

    Was ist bei Wind und Regen?

    Regen ist überhaupt kein Problem! Das Wasser sammelt sich in der Markise. Wenn es dann schwerer wird, sinkt die Markise einfach leicht ab und das Wasser kann abfließen.

    Die Markise hält so einiges an Wind aus, aber sie ist nicht unzerstörbar.

    Sie ist bis 25 km/h Windgeschwindigkeit zugelassen. Darüber ist die Markise abzubauen. Informiere dich über das Wetter vor Ort. Besonders an der See können spontan heftige Böen auftreten.
     
    Die Markise darf nur unter Aufsicht betrieben werden. Beim Verlassen des Zugriffsbereiches ist die Markise abzubauen.

    Schau dir mal dieses Video an!

    Lieferumfang


    Technische Daten & Pflege

    Puckmound, Aufnahmen, Anbauteile
    Material: Edelstahl

    Stangen
    Material: CFK

    Markisenstoff | Befestigung
    Material Markise: Nylon/Polyester
    Wassersäule 5000mm

    Gesamtgewicht
    1,5 - 2,7kg - je nach Ausführung

    Pflegehinweise

    Stoff

    • Bitte stets trocken verstauen. Wenn der Stoff naß verpackt wird kann es zu Stockflecken kommen und die Beschichtung kann Schaden nehmen. Das führt zu einer Wasserdurchlässigkeit. Also: Wenn's mal regnet und man schnell alles zusammenpackt: den Stoff einfach bei der nächst möglichen Gelegenheit nochmal auspacken und ordentlich trocknen lassen.

    Stangen

    • Die Stangen sollten stets sauber gehalten werden. Wenn die Stangen mit Staub und Dreck bedeckt sind, können diese durch Kratzer verschleißen. Die Klemmung der Teleskopauszüge kann leiden und die Stabilität kann abnehmen. Hier empfehle ich einen besonders sorgsamen Umgang und eine Reinigung mit einem sauberen Tuch nach jedem Gebrauch, um Staub und Dreck zu entfernen. Also mit einem sauberen Tuch abreiben und sie erst dann zusammenschieben.

    Allgemein

    • Reinigung mit Wasser und sauberem Tuch. Keine scharfen Reiniger, Alkohol oder Bremsenreiniger verwenden. Stoff nicht in der Waschmaschine waschen.
    Gewährleistung & Rücknahme & Herstellerangaben

    Jegliche Rücknahme und Haftung ist bei diesem Produkt ausgeschlossen, sobald du irgendetwas an den gelieferten Teilen bearbeitet hast.

    Die Stangen sind vom Umtausch ausgeschlossen, sobald sie einmal in Gebrauch waren, da eine unsachgemäße Bedienung nicht ausgeschlossen werden kann.

    Hier findest du die Bedienungsanleitung: Klick!

    Hersteller nach GPSR
    Camper&Go - Mirko Frank
    Dammstr. 30
    75382 Althengstett
    www.camper-and-go.com


    Shipping Notes
    • Free Standard Shipping on $100+ Orders to the USA.
    • Except Preorder products are shipped in 48 hours.
    • Delivery to the USA:
    1. Standard Shipping : 3-10 business days
    • If time is of the essence, please consider selecting expedited delivery for faster service.
    Exchange/Return Notes
    • We offer a 30-day return/exchange service after receiving.
    • Final sale items are not eligible for returns or exchanges.
    • To process your return/exchange, please contact us at [email protected]
    • Please click here for more details>>> Return & Exchange Policy
    SKU: 35723291130

    Discover Niche Categories That Outsell wohnmobil markisen hersteller

    Top-Converting Item to Boost Your Average Order

    4.9 ★★★★★
    Based on 1391 reviews
    Sort
    Highest Rating
    Newest First
    Oldest First
    Product Reviews
    C
    Verified Purchase
    Cleaver
    Massapequa, US
    ★★★★★ 4
    Best product I've tried so far but still temporary. YMMV.
    Size: 1 Count (Pack of 1)
    This product really does work. It is the best I've used. I purchased in September 2024 and am writing this review in May of 2026, roughly one year and 8 months later. I noticed product failure a little after a year after application and it has been degrading slowly since. Currently the product is visible like a layer of clear paint flaking off and you can physically scratch some off. Here are the pros and cons. Pros: Clarity, relative ease of use, value Cons: Taping and sanding, doesn't last for as long as you own your car as claimed Best used as a temporary fix. Bottom line, would I use it again? Yes. What am I doing today? Replacing the headlights completely. Why? I plan on keeping my car for longer than a year.
    WAS THIS REVIEW HELPFUL?YesReportShare
    Reviewed in the United States on May 8, 2026
    S
    Verified Purchase
    Sahiti
    Lake Worth, US
    ★★★★★ 5
    Review After Using on 3 Different Cars over 3 years
    Size: 1 Count (Pack of 1)
    Cerakote Headlight Restoration Kit : After Using on 3 Different Cars over 3 years This is my second time purchasing the Cerakote Headlight Restoration Kit, and I’ve now used it across three different vehicles. At this point, I feel comfortable saying this product genuinely works when used correctly. Before trying this kit, I considered replacing my headlights entirely. The cheapest replacement set I found was around $150 just for the parts. Installation would have required removing the grille, bumper, and other components, which adds time and complexity. For an older vehicle, that didn’t make financial sense. Instead, I chose to restore the original headlights. Cost and Value My first package cost me $17, and I restored two cars with that single kit ( about 9$ per pair). That alone made it worth it. For under $20: I restored two separate vehicles Avoided buying new headlight assemblies Avoided removing the bumper and grille Compared to a $150+ replacement plus labor, the savings are significant. Durability 1 year+ under direct Cali sunlight (currently on year 2 and still good) First Car – Learning the Process The first time I used the kit, my results were decent but not perfect. That was mainly because I didn’t fully understand how sanding and polishing actually work. ( this reoxidized fastest under 8 months, but it was mostly my fault) I didn’t initially realize: The headlight needs to stay wet during sanding Oxidation must be completely removed before applying clear coat Even pressure matters/ 50% overlap coverage when appling ceramic Once I understood that sanding is the most important step, everything improved. Second Car (beater) Major Improvement The second vehicle was heavily oxidized and yellowed. I used the remaining material from that same $17 kit and restored it completely. The clarity difference was dramatic. It looked close to factory condition, and night visibility noticeably improved. That was when I realized the product itself is solid; the key is proper technique. Third Car ; Recent purchase By the third car, the process felt straightforward. I followed the instructions carefully, kept the surface wet while sanding, and applied the clear coat evenly in one smooth pass. The final result was clear, glossy, and uniform. No haze, no streaking. Durability On my first vehicle, the restoration lasted close to a year perfectly( I sold that car this year and it still had clear headlights), and that car was parked outside in direct sun most days. For a DIY kit at this price point, that level of durability is impressive. Final Thoughts I seriously considered spending $150 on replacement headlights( this was cheapest ) and dealing with removing body panels. Instead, I spent $17 and restored two cars. Now having used it on three vehicles, I can say this kit is effective, cost-efficient, and worth the time if you follow the process properly. It does require effort and patience, but the results justify it. I would purchase it again.
    WAS THIS REVIEW HELPFUL?YesReportShare
    Reviewed in the United States on February 18, 2026
    Y
    Verified Purchase
    YetAnotherITGuy
    San Leandro, US
    ★★★★★ 5
    works as advertised!
    Size: 1 Count (Pack of 1)
    I purchased this kit to renew the headlights on my 2016 Nissan Frontier pick-up. The headlights had become slightly oxidized and dull -- not that bad but it was bothering me and for the price of the kit I figured it was worth the effort to attempt to renew them. All I can say is -- WOW, what a difference. The end result looked like new -- clean, brilliant and bright. Read the directions (2 or 3 times) and follow them EXACTLY. Total time for me from opening the kit to being done was about 2 hours and I was taking my time. This kit is different in that the final step applies a UV resistant coating which really makes the glass super transparent. Great investment in the time and money. I can't stop admiring my new (old) headlights!
    WAS THIS REVIEW HELPFUL?YesReportShare
    Reviewed in the United States on May 14, 2026
    A
    Verified Purchase
    Alex
    Birmingham, US
    ★★★★★ 5
    Incredible Results! The "Z-Line" is Back!
    Size: 1 Count (Pack of 1), Size: 1 Count (Pack of 1)
    I’ve tried a few "wipe-on" fixes in the past, but the CERAKOTE® Ceramic Headlight Restoration Kit is in a completely different league. If you are tired of hazy, yellowed lenses and weak nighttime visibility, look no further. 📖 Instructions & Ease of Use The first thing that stood out was the clarity of the instructions. The kit breaks everything down into a simple, step-by-step process. Even if you aren't a "car person," the directions are foolproof. They don't just tell you what to do; they explain why each step matters, which gave me the confidence to get the job done right the first time. ✨ Restoration Effectiveness As you can see in my Before and After photos, the transformation is night and day. My headlights went from a dull, oxidized yellow to a factory-fresh, crystal-clear finish. It didn't just "clean" them—it completely rejuvenated the plastic. 🔦 The Real Test: Light Output & Beam Pattern The most impressive part isn't just how the car looks, but how it performs at night. I’ve included a photo of my car parked against a wall in the dark to show the comparison: Passenger Side (Restored): You can see a sharp, distinct cutoff line and the perfect "Z-line" pattern. The light is focused exactly where it needs to be on the road. Driver Side (Not Restored yet): The light is completely distorted. There is no cutoff, just a messy blob of light that scatters everywhere, likely blinding oncoming traffic while providing less actual visibility for me. Final Verdict This kit doesn't just make your car look better; it’s a genuine safety upgrade. Seeing that crisp Z-line back on the wall proves that the clarity is internal as well as external. Highly recommended!
    WAS THIS REVIEW HELPFUL?YesReportShare
    Reviewed in the United States on April 15, 2026
    B
    Verified Purchase
    Beautiful table. Quality construction
    Louisville, US
    ★★★★★ 5
    Like factory part
    Color: Tan, Size: Driver side
    Fit like factory. I changed the mounting bracket and bolts to have the factory one instead of their set up though
    WAS THIS REVIEW HELPFUL?YesReportShare
    Reviewed in the United States on April 13, 2026

    recommand products